Messages
Quick answer - Messages is where your team reviews SMS history, sends customers one-off texts, manages reusable message templates, and controls automated SMS follow-ups.
Use this guide when - You need to text a customer, check what was already sent, set up message templates, or decide which automatic recovery messages Resk should send.
Before you start - Confirm the customer phone number is correct and make sure the message is appropriate to send by SMS.
Open Messages
- Choose Messages from the left menu.
- Use the tabs at the top of the page:
- History shows sent and received messages.
- Templates manages reusable SMS wording.
- Settings controls automation, sender ID, and recovery workflows.
- Use the date range or filters when you only want to review a specific period.
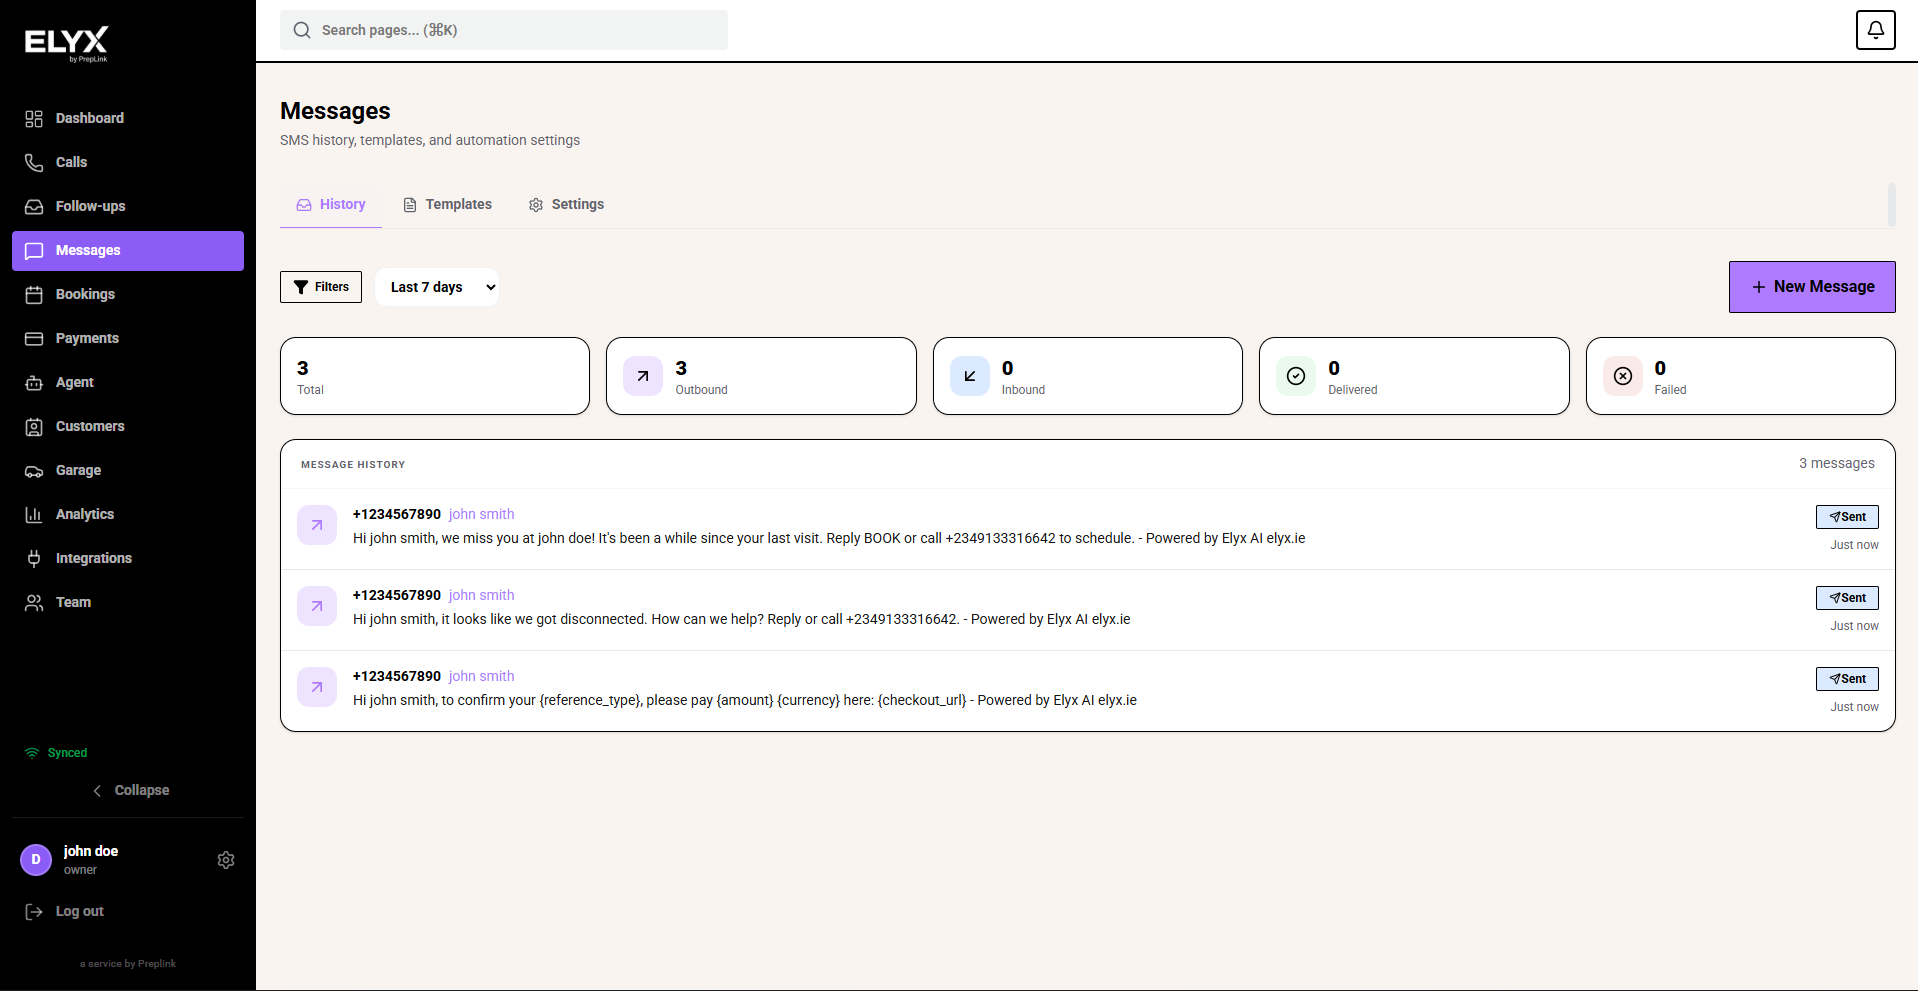
Review message history
Use History when you need to check what a customer has already received.
- Open Messages.
- Stay on the History tab.
- Search or filter until you find the customer or message.
- Check the status, date, recipient, and message content.
- If the message was part of a booking, missed call, abandoned call, reminder, or no-show flow, check that context before replying.
This is usually the safest first stop before sending a new SMS. It helps your team avoid sending the same thing twice or replying without the full story.
Send a new message
Use this for a manual customer update.
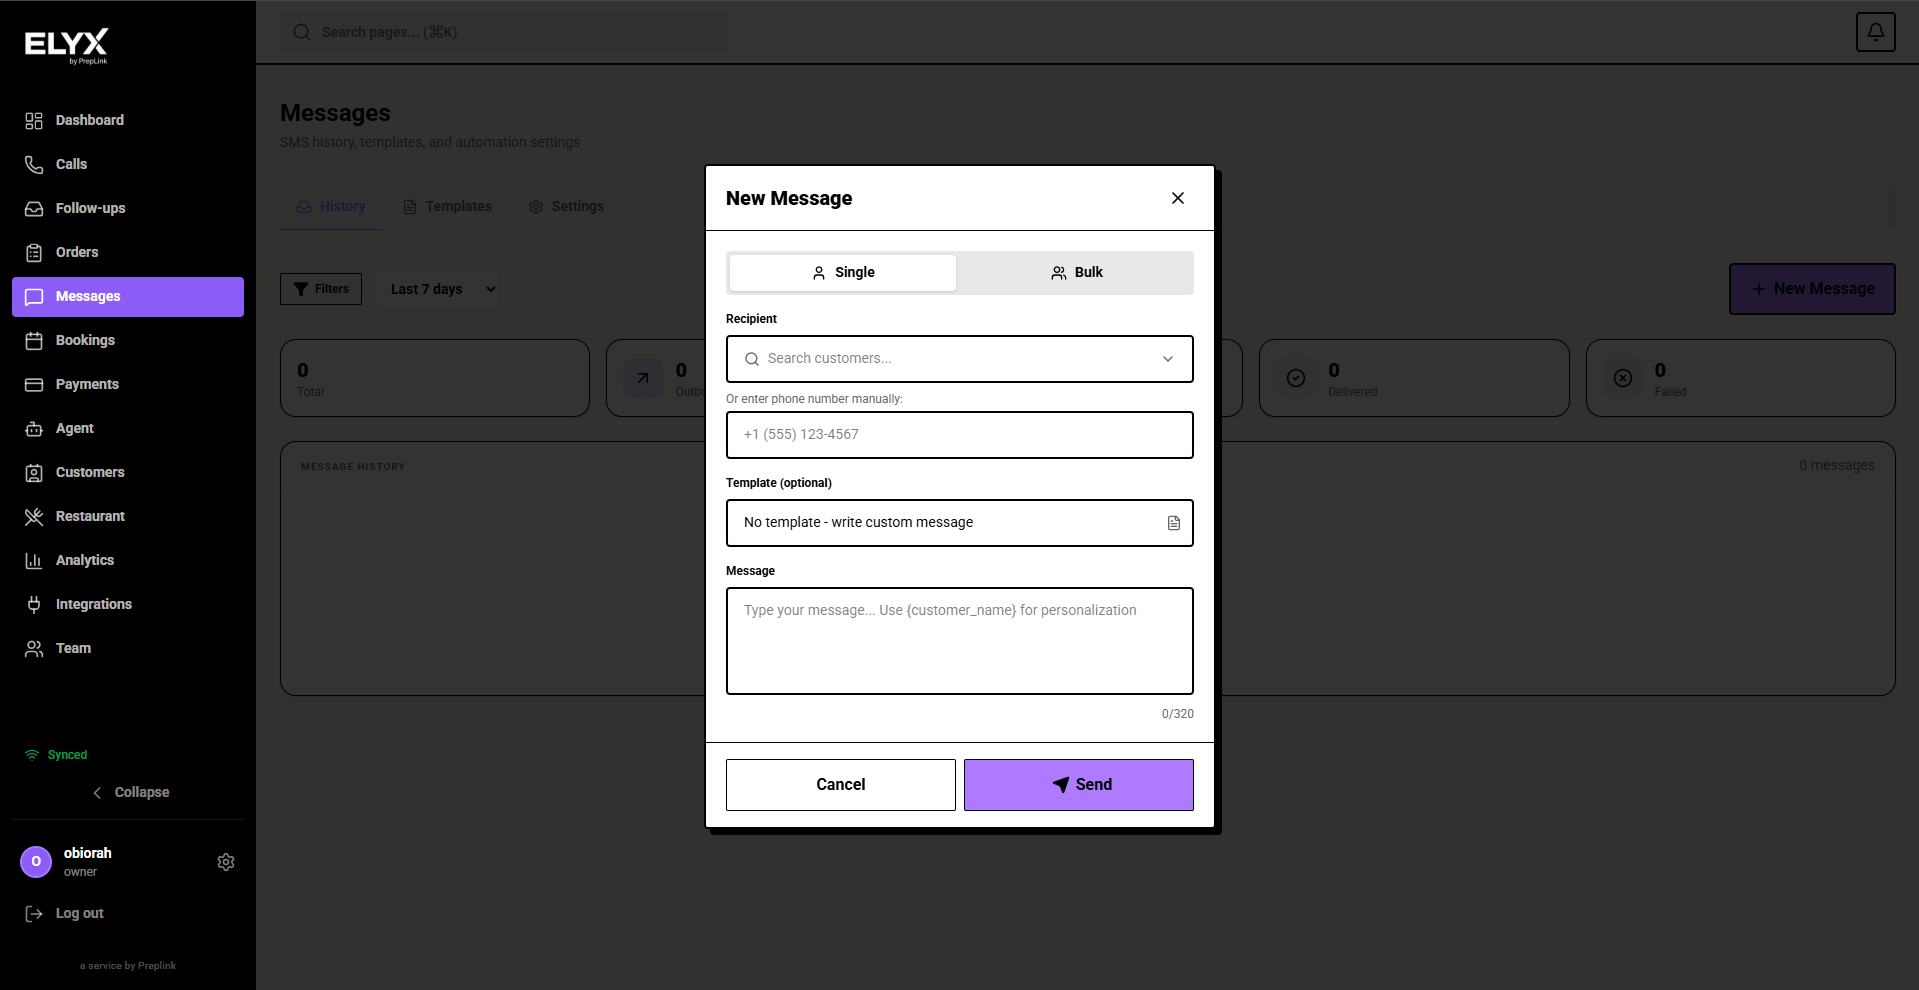
- Choose New Message.
- Select or confirm the customer.
- Confirm the phone number.
- Write a short message in plain language.
- Check the date, time, spelling, and any link before sending.
- Choose Send.
- Return to History and confirm the message is listed.
Good manual SMS examples:
Hi Sam, your appointment is confirmed for Tuesday at 10:30. Reply here if you need to change it.
Hi Sam, thanks for calling. We tried to reach you and will call again after 2pm today.
Hi Sam, here is your payment link for the deposit: [link]
Message from a customer, call, booking, or follow-up
You may also see an SMS or message action inside other parts of Resk.
- Open the customer, call, booking, job, or follow-up.
- Check the latest notes and activity first.
- Choose SMS or Message.
- Confirm the customer and phone number.
- Write the message.
- Send it.
- Return to the original item and mark the work done if the SMS completed the task.
Manage message templates
Templates are saved SMS messages your team can reuse for common situations. They keep wording consistent and save time.
- Open Messages.
- Choose the Templates tab.
- Review the template categories, such as missed call, abandoned call, reminder, no-show, quote, or reactivation.
- Use the status toggle when a template should or should not be active.
- Open a template to check the wording before your team uses it.
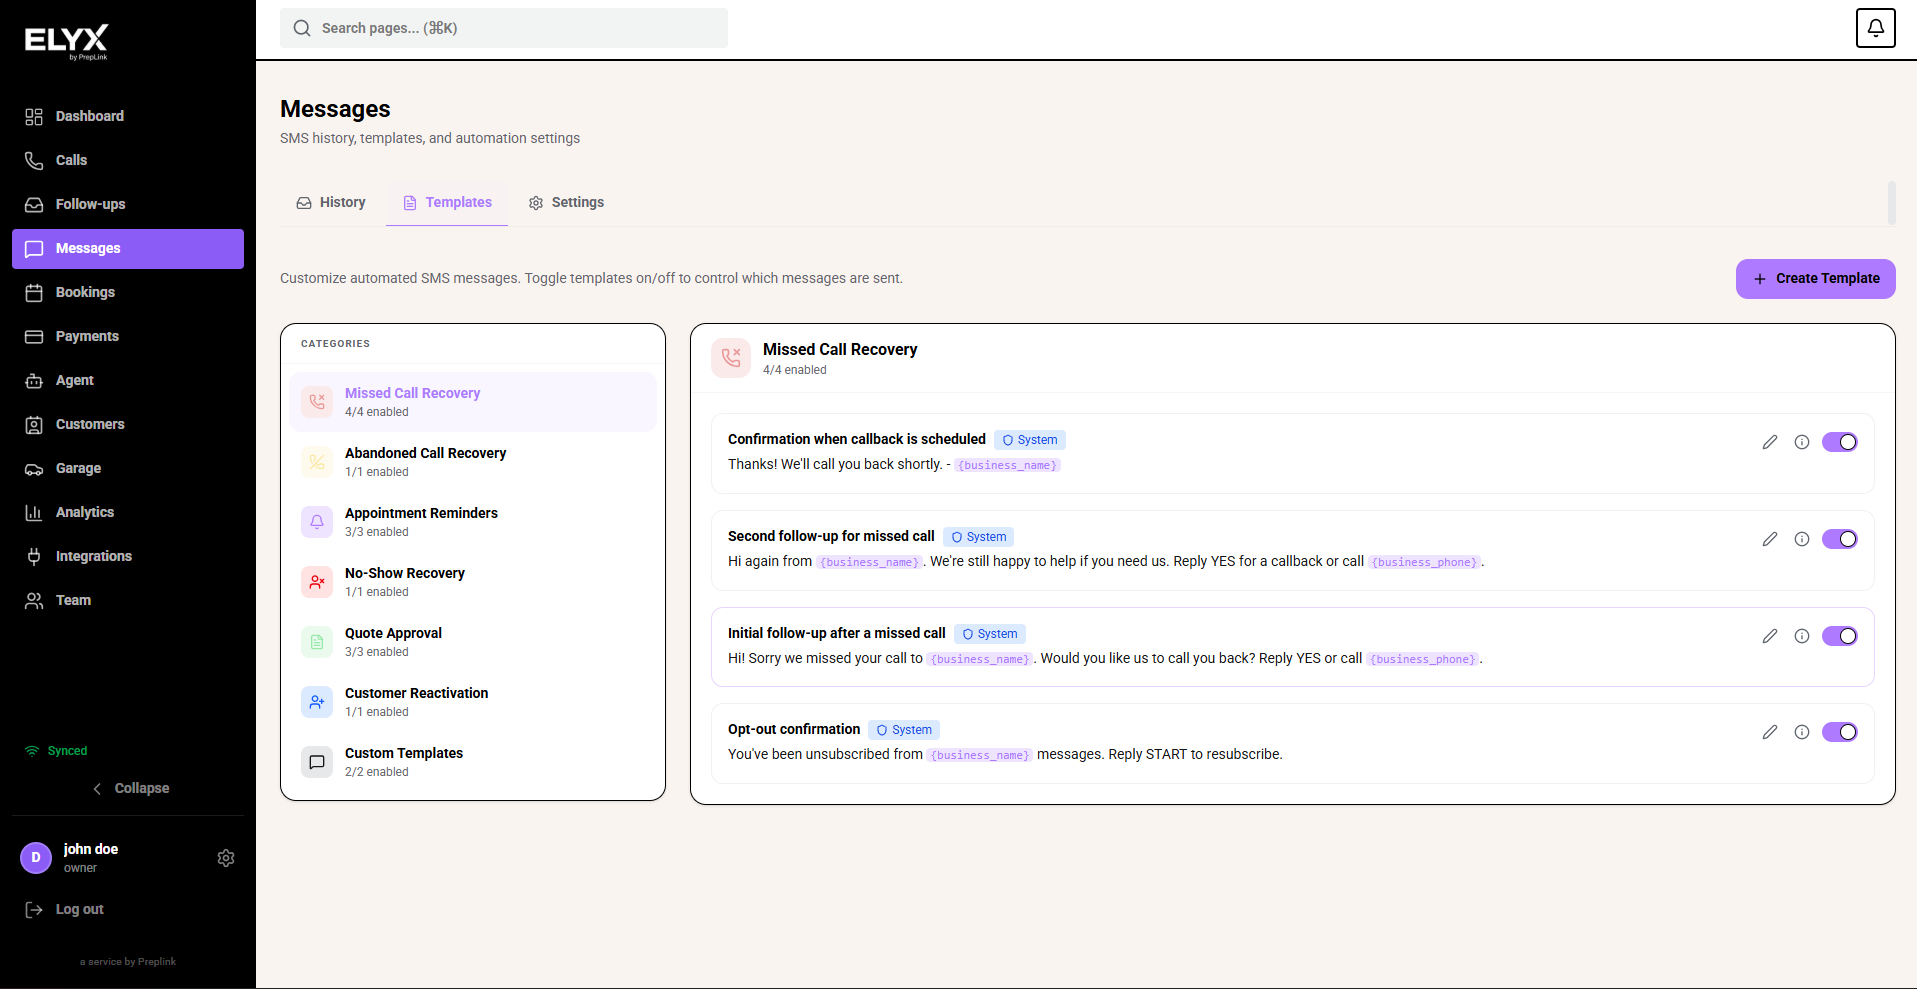
Some templates are system templates. These are provided by Resk and may be locked from editing. Create a custom template when you need wording that matches your business tone.
Create a message template
- Open Messages.
- Choose Templates.
- Choose Create Template.
- Enter a clear Name, such as
Missed call follow-uporQuote reminder. - Write the Template Text.
- Add variables where Resk should insert customer or booking details.
- Set the Delay in minutes if the template is used by an automated workflow.
- Review the preview carefully.
- Choose Create Template or Save.
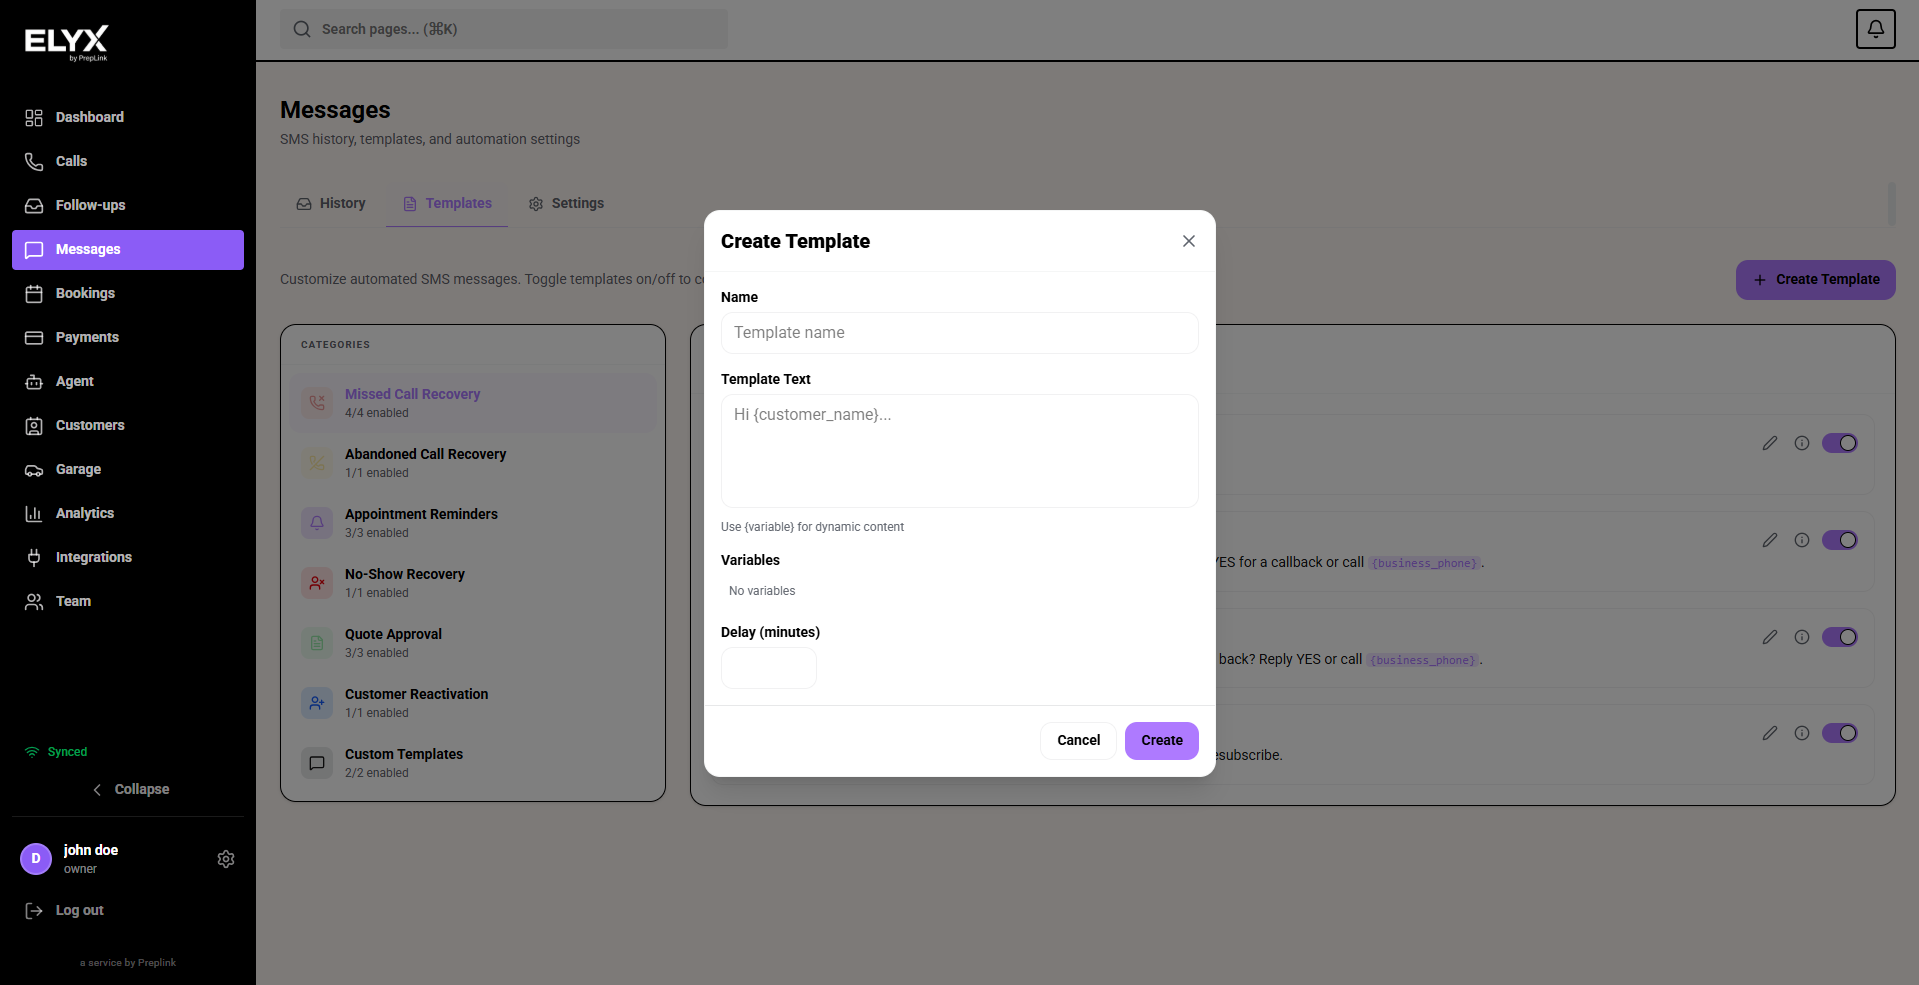
Variables are placeholders inside the message. For example, a template might include a customer name or booking time. Use variables only when you are sure Resk has that information. A short, reliable template is better than a clever one that can send with missing details.
Set up message settings
Use Settings to control whether Resk can send automated SMS messages and how often customers can be contacted.
- Open Messages.
- Choose the Settings tab.
- Turn SMS Automation on or off.
- Use Business Hours Only if automated messages should only send during your working hours.
- Set Max Messages Per Customer Per Day to avoid over-contacting customers.
- Choose Save Changes.
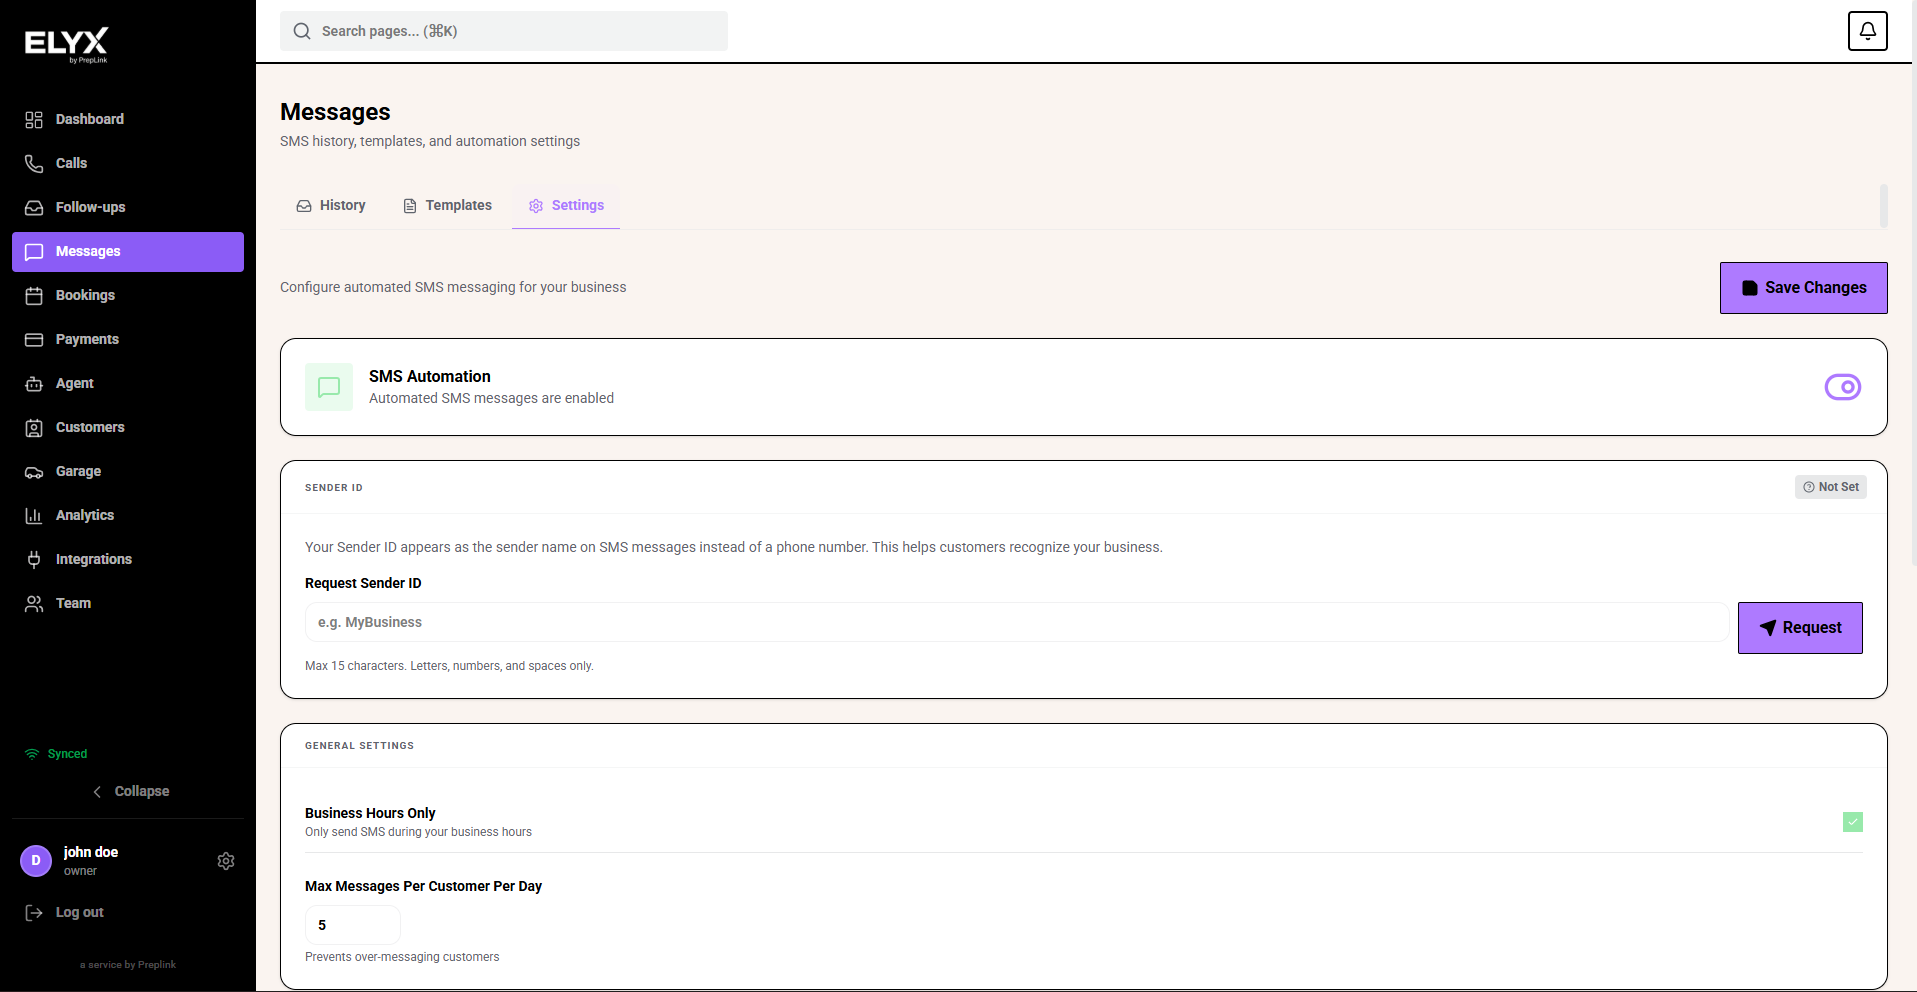
Keep the daily limit realistic. A very low limit can stop useful reminders. A very high limit can make customers feel spammed if several workflows trigger on the same day.
Request a sender ID
A sender ID is the name customers see as the SMS sender instead of a plain phone number. For example, your customer may see your business name at the top of the text message thread.
Use it when you want customers to recognize that the message came from your business.
- Open Messages.
- Choose Settings.
- Go to Sender ID.
- Enter the sender name you want customers to see.
- Keep it to 15 characters or fewer.
- Use only letters, numbers, and spaces.
- Choose Request Sender ID.
- Wait for the status to update.
Sender IDs can show as Pending, Approved, or Rejected. Approval usually takes 1 to 2 business days. If a request is rejected, use a clearer version of your business name and avoid punctuation or extra wording.
Set recovery workflows
Recovery workflows are automated SMS follow-ups for common missed opportunities.
- Open Messages.
- Choose Settings.
- Scroll to Recovery Workflows.
- Turn on only the workflows your business wants to use.
- Set the delay for each workflow.
- Save your changes.
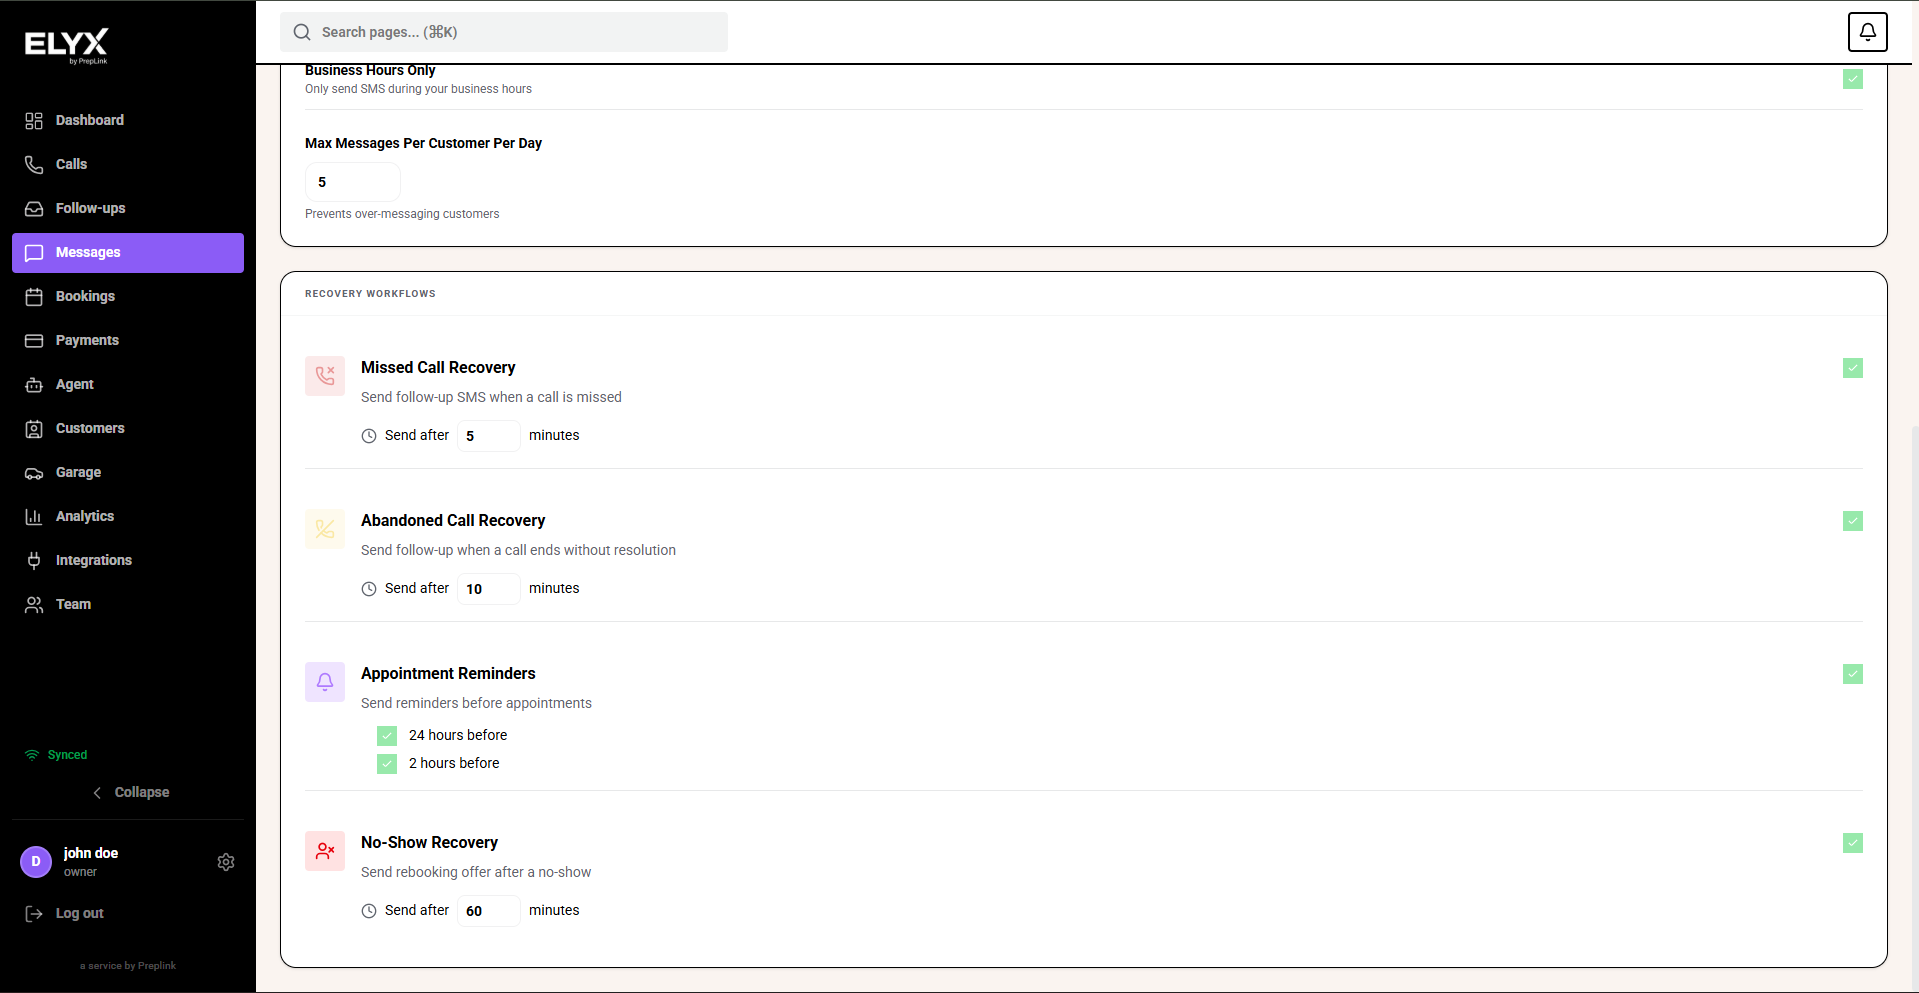
The main workflows are:
- Missed Call Recovery - sends a text after a call is missed.
- Abandoned Call Recovery - sends a text when a caller drops off before the issue is handled.
- Appointment Reminders - sends reminders before bookings, such as 24 hours or 2 hours before the appointment.
- No-Show Recovery - follows up after a customer misses an appointment.
Start with conservative delays. For example, a missed call text should usually go out soon after the missed call, while no-show recovery may need a little more time so staff can confirm the customer really did not arrive.
Before sending marketing messages
Check your business policy and local consent rules before sending promotional SMS. A customer asking for a booking update is different from a marketing campaign.
Common mistakes
- Sending a manual SMS before checking message history.
- Leaving automation on while using old or unfinished templates.
- Requesting a sender ID that is too long or does not match the business name.
- Setting the daily message limit so low that reminders cannot send.
- Turning on every workflow at once without reviewing the wording.
- Sending long messages that split badly on some phones.
- Texting marketing messages to customers who did not opt in.
Related articles
Last updated: April 2026